Room Combine
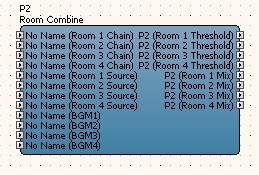
Today, most hotels and conference facilities rely on flexible room configurations for a wide variety of events. Typically this involves one or more large rooms that may be divided by flexible partitions. These combinations of space are referred to as "room combining" and have their own unique requirements when it comes to the audio system. The key is the management of the audio signal to interconnect sub-room sound systems when those sub-rooms are combined into larger rooms. The Room Combine PO (Processing Object) simplifies system setup for such a 'room combining' application. When rooms are "combined", all controls for each involved room will mirror each other perfectly. These controls are objects like faders, mute buttons and source selectors.
Adding a Room Combine Processing Object
The Room Combine Processing Object (P.O.) is located under the "Mixers/Gains" section. A Room Combine P.O. can be added by right-clicking inside the Default Config screen as follows:
Input and Outputs
Chain/Threshold Signal Routing
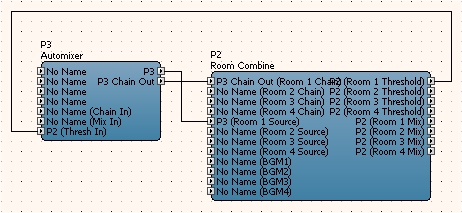
The Room Combine can route slave automixer control and audio signals. When two or more rooms are involved all automixers will perform as one single automixer to ensure proper gain levels and channel weighting are achieved. These signals are the Chain and Threshold signals located on Slave automixers. Master Automixers or Standalone automixers cannot be used in conjunction with the Room Combine for proper operation. Slave Automixers do not have a Master gain control. When using the Slave Automixer in conjunction with the Room Combine P.O., the Master gain fader is the "Mix" fader located inside The Room Combine P.O.
Room Source
The Room Source inputs are for receiving a mono audio output from each room. The Source signal input needs to be connected to the output signal of the Slave Automixer if Automixers are utilized.
Background Music (BGM)
The BGM input is used for receiving audio to be distributed in each room as background music. When two or more rooms are combined, the combined rooms will receive the same BGM source.
Room Mix
This output from the P.O. has the mixed audio signal for each room, composed of the room source audio and the BGM audio.
Properties
Configure Rooms
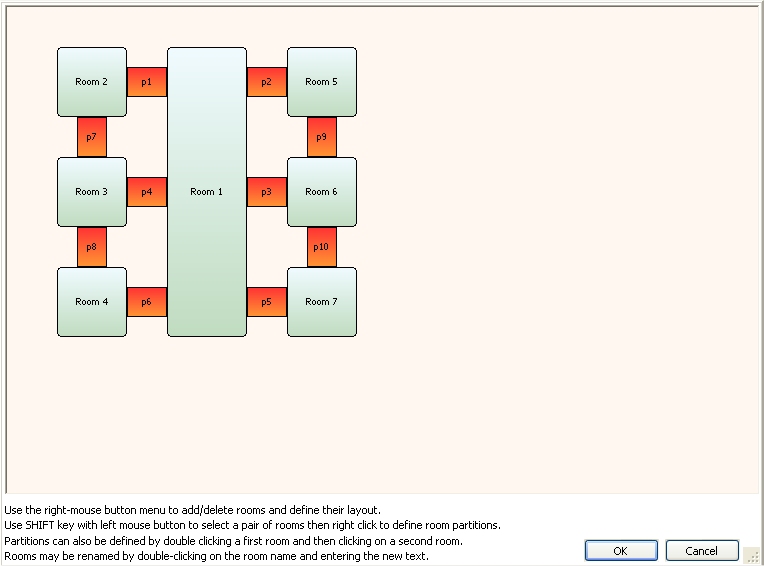
This dialogue box allows you to configure the exact layout of the rooms, including all moveable partitions. To open the "Configure Rooms" pane, click on the "..." button on the right-most side of the Configure Rooms property. The maximum number of rooms is 49, but the useable number of rooms will depend on the DSP resources of the target device. The layout of rooms is totally flexible, for example a 'square grid' up to 7x7 rooms can be specified, or a layout of 49x1 rooms, or anything in between. The default name for each room and each partition can be edited by the user and this will be reflected in the label used on the default control panel.
Selecting items with the mouse
Selecting Rooms - Rooms may be selected on the dialog by clicking on the room with the mouse. A grey border will be shown around the selected room. Multiple rooms may be selected by using the SHIFT key with the mouse click.
Selecting Partitions - Partitions may be selected on the dialog by clicking on the partition with the mouse. A grey border will be shown around the selected partition. Multiple partitions may be selected by using the SHIFT key with the mouse click. When a partition has just been selected, the two rooms which are connected by the partition will be highlighted with a green border.
De-selecting Rooms and Partitions - Left clicking anywhere on the background of the dialog with the mouse will de-select all currently selected items.
- Selecting multiple items - It is also possible to select multiple items from the dialog by left clicking the mouse on the background of the dialog, holding the left mouse button down and dragging the mouse to form a rectangular area which is used to select rooms and partitions on the dialog. The items selected in this way will be shown with the grey border around them.
Adding Room(s)
Rooms can be added by right clicking with the mouse on the background of the dialog and selecting either 'Add Room', or one of the 'Add Room Grid' options from the context menu.
Deleting Room(s)
Rooms may be deleted by selecting a room (or multiple rooms), right clicking with the mouse and selecting the 'Delete Room(s)' item from the context menu.
- Alternatively, the DELETE key may be used to delete all rooms which are currently selected.
Adding a Partition
A partition may be added by selecting exactly two rooms, right clicking with the mouse and selecting the 'Add Partition' item from the context menu.
- A partition may be added by double-clicking on a first room with the mouse, then moving the mouse and left-clicking on a second room to be associated with the partition. (hint : When double clicking the first room, avoid double-clicking on the room name text area of the room as this is used to customise the room name text)
Deleting Partition(s)
Partitions may be deleted by selecting the partition (or multiple partitions), right clicking with the mouse and selecting the 'Delete Partition(s)' item from the context menu.
- Alternatively, the DELETE key may be used to delete all partitions which are currently selected.
Moving a Room or Partition
Select the Room or Partition to be moved, hold the left mouse button down and drag the selected item.
The cursor will change to show the selected item can be moved in any direction.
- The selected item can then be re-located to its new position by dragging the mouse with the left button held down. Release the left mouse button to complete the move operation.
Moving multiple Rooms or Partitions
Select multiple Rooms or Partitions by either left clicking on each item while the SHIFT key is held down, or by dragging the mouse to form a rectangle which encompasses the items to be selected.
Keep the SHIFT key held down, and left click and drag any one of the selected items.
The cursor will change to show the selected items can be moved in any direction.
- All the selected items can then be re-located to their new position by dragging the mouse with the left button held down. Release the left mouse button to complete the move operation.
Re-Sizing a Room or Partition
When a room or partition is selected, the grey border is created with small black square re-sizing points which can be used for re-sizing the selected item.
To re-size, move the mouse until it sits over one of the re-sizing points, the cursor will change to indicate the direction for re-sizing.
- Now hold the left mouse button down and drag the mouse in one of the directions indicated by the cursor. Release the left mouse button to end the re-sizing operation.
Renaming Rooms or Partitions
- Rooms and Partitions are created with default names. These names can be customised by the user by double clicking on the room or partition name and entering the new text for the Room or Partition name. This text will appear throughout the 'Room Combine' processing object to identify the room or partition.
Number of Rooms
This is a read only property showing the number of rooms actually configured in the 'Configure Rooms' dialog. To add or delete rooms or change the layout of the rooms shown in the Default Control Panel it is necessary to click on the right side of the "Configure Rooms" property located in the Properties tab.
Number of Partitions
This is a read only property showing the number of partitions actually configured in the 'Configure Rooms' dialog. To add or delete partitions or change the layout of the partitions shown in the Default Control Panel it is necessary to click on the right side of the "Configure Rooms" property located in the Properties tab.
Number of BGM Inputs
Sets the number of background music channels (0 to 24) available for each room.
Use Automixer I/O
When set to 'Yes', 'chain' and 'threshold' signals will be available for wiring with automixers.
Enable Stereo
Enables or disables stereo signals in/out of each room. Enabling this property will create Left/Right signals for the following inputs :
Mix BGM Signal Path = Yes
'Room Source' L/R inputs,
'BGM' L/R inputs,
'Room Mix' L/R outputs.
Mix BGM Signal Path = No
'Room Source' L/R inputs,
'BGM' L/R inputs,
'Room Source' L/R outputs,
'Room BGM' L/R outputs.
When Stereo is selected, separate Left and Right channel meter inidcations will be available on the default control panel.
Mix BGM Signal Path
Enables or disables the mixing of the 'BGM' signal with the 'Room Source' input. When enabled the room combine will have a 'Room Mix' output signal per room which is the mixed combination of 'Room Source' and 'BGM' input signals for the room. When disabled, the room combine will have separate 'Room Source' and 'BGM' output signals per room.
Priority Partition Mode
With priority partition mode set to 'Yes' :
Room Combine will operate in 'partition' mode where opening or closing partitions determines which group a room will be part of.
When each room is created it will be assigned a 'default group' number which is the same as the room number.
When rooms are combined, the group number for the combined room will be set to the lowest numbered room which is present in the room combination.
- When a room is combined with an existing group of rooms, the room controls will take on the values of the highest priority room (i.e. lowest room number) in the group which is formed.
Example 1) Room 1 and Room 2 are combined to form a new room group (group 1). Room 1 master gain is set at 0dB, Room 2 master gain is set at -10dB. At the instant the rooms are combined, both rooms master gain will be set to 0dB.
Example 2) Room 1 and Room 2 are already combined in a room group (group 1). Room 3 is combined into the group. Room 1 and 2 master gains are set at 0dB, Room 3 master gain is set at -20dB. At the instant the rooms are combined, all rooms master gains will be set to 0dB.
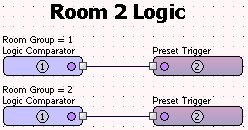
This mode can be useful when you need to perform some logic which is dependent upon knowing the current group that a room is in, e.g. disable the room controls when a room is combined with a higher priority 'master' room. From the design tree you can drag and drop the group (for the room you are checking) onto a logic comparator. Then assign the compare value to be the group number you wish to test against. The logic comparator can then be wired to other objects such as presets, logic ends and so on which can be used to trigger other processing objects or actions. The example shown below can be read as "when room 2 is combined with room 1, i.e. when room 2 becomes part of group 1, do this particular action", and "when room 2 is not combined with room 1, i.e. when room 2 is part of group 2, do this (other) action"
When priority partition mode is set to 'No' :
Room Combine may operate in 'room' mode or in 'Partition' mode. In 'room' mode rooms are selected to join a particular group.
Each room is created with a default group of 0 ('unassigned').
When rooms are combined, the next available group (in sequence 1..number of groups) will be used to determine the group for the room combination.
- When a room is combined with an existing group of rooms, the room controls for the room group formed will take on the most conservative values of all the rooms in the group which is formed.
Example 1) Room 1 and Room 2 are combined to form a new room group (group 1). Room 1 master gain is set at 0dB, Room 2 master gain is set at -10dB. At the instant the rooms are combined, both rooms master gain will be set to -10dB.
Example 2) Room 1 and Room 2 are already combined in a room group (group 1). Room 3 is combined into the group. Room 1 and 2 master gains are set at 0dB, Room 3 master gain is set at -20dB. At the instant the rooms are combined, all rooms master gains will be set to -20dB.
Changing any of the above properties will cause the default
control panel to close.
Use Signal Names
When set to 'Yes' the signal names for each of the BGM source inputs will be reflected in the default control panel BGM Input drop down list box.
When set to 'No', the BGM Input drop down list box on the control panel will be populated with numbers from 1 up to the number of BGM sources.
Group Colours
Group colours are used to indicate which group a room is part of. These appear on the 'Room Controls' and 'Room Combine' pages of the default control panel. Changes to this property will to override the default colours used to represent the active groups.
Default Control Panel
The Room Combine default control panel is built dynamically from the layout of the rooms specified in the configure rooms dialogue located in the Properties tab. It consists of two pages; Room controls and Room Combining.
Room Controls
The controls for each room are shown on the 'Room Controls' tab of the default control panel. The title of each room is displayed at the top of the controls, with the background colour indicating which group the room belongs to. For example, the default panel below shows rooms 1, 2 and 5 in one group, rooms 3 and 4 in a second group and rooms 6 and 7 in a third group. When rooms are combined in a group their controls will be linked to one another in an 'exact link'.
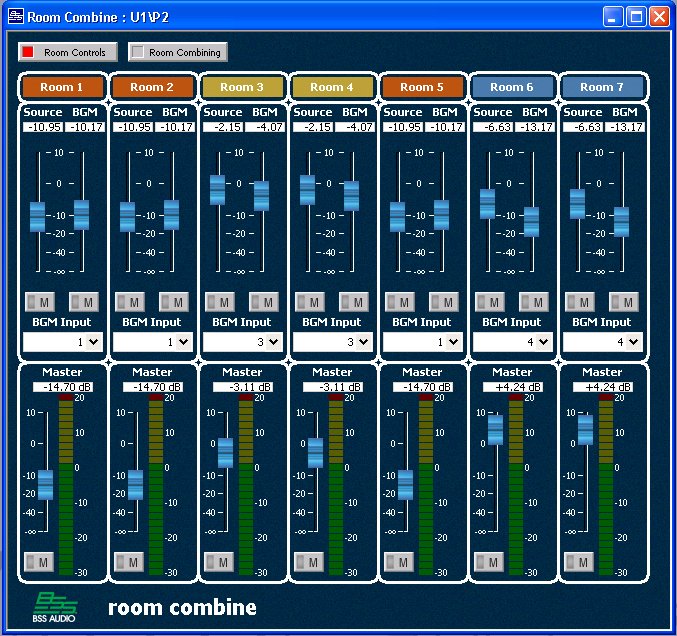
Source Fader
A fader is provided to control the level for each Source input.
Source Mute
A mute control is provided for each of the Source inputs.
BGM Fader
This fader controls the level of the background music being fed into each room. This will not be displayed if the number of BGM inputs is set to 0.
BGM Mute
Used to mute or unmute the background music being fed into each room. This will not be displayed if the number of BGM inputs is set to 0.
BGM Input
Use this source select to chose which BGM source is being fed into the room. This will not be displayed if the number of BGM inputs is set to 0.
Master Fader
This fader controls the mix of the source input and the BGM input.
Master Meter
This meter represents the audio which is being fed into the room. If the 'Enable Stereo' property is set to 'Yes' then separate meters for both left and right stereo channels will be displayed.
Master Mute
This mute controls the mute-state of all sources being fed into this room
Room Combining
The Room combining page can operate in two different
modes. These are detailed below. 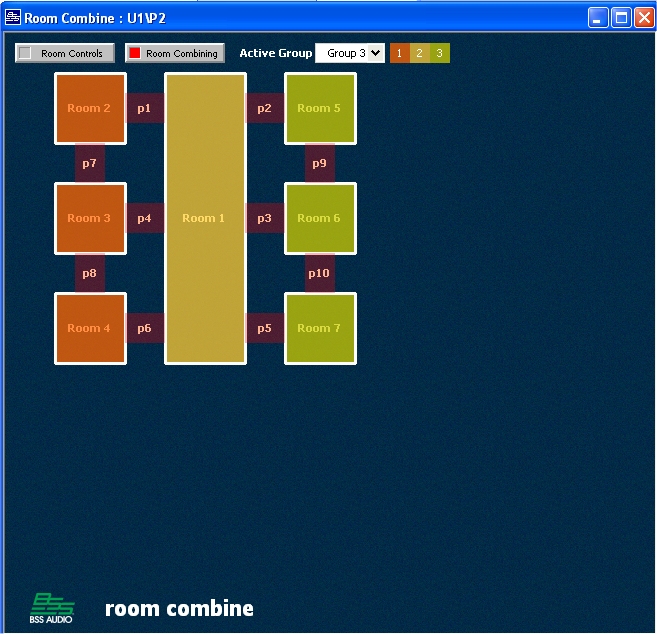
Operation Modes
Room Mode
In room mode you select which rooms go into which groups.
Creating a group of rooms
Select the active group from the drop down list, or by clicking on the group button to the right of the active group drop down list.
Click on a room to allow it to become part of the group (On) or to leave the group (Off).
The room is set to the active group, this is indicated by the colour of the room in the control panel.
Select another room to add to the active group.
- All the controls in a group are linked together in an exact link. When the link is established all controls, faders, mutes and so on are set to the new group value. The rules for determining the value of these control settings depends upon the Priority Partition Mode property setting.
Removing a room from a group
Select "None" as the active group from the drop down box
Click on the room to remove from the group
The room group number is set to "None" (0), and the room colour becomes black to indicate that it is not part of any group
- All controls in the room are unlinked from the other rooms in the group
Partition Mode
Partition mode is where rooms are combined according to the current state of a 'wall partition' connecting the two rooms. In a real situation the wall partition state could be driven from a relay contact coming into the Soundweb London unit as a control port input.
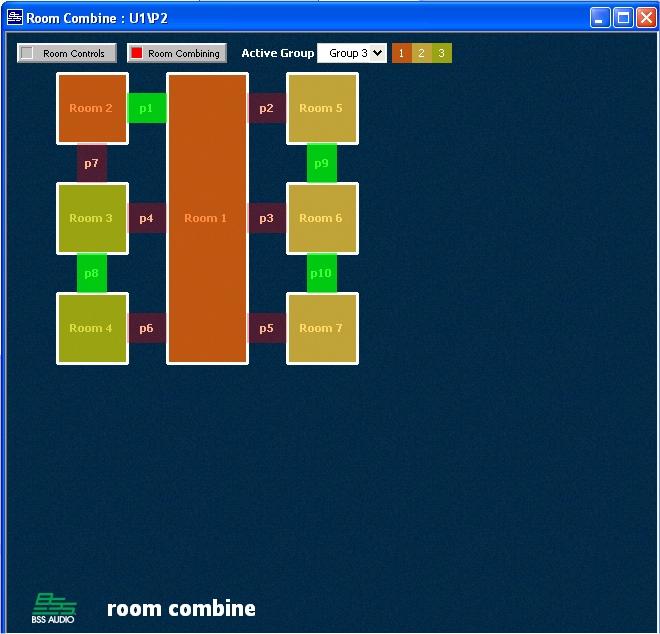
Opening a Wall Partition
The wall partition between rooms 1 and 2 is opened
Room 2 joins room 1's group as it is has lower group number
The rooms become the same colour to show the rooms are in the same group
- All controls for room 1 and 2 are linked together in an exact link
Closing a Wall Partition
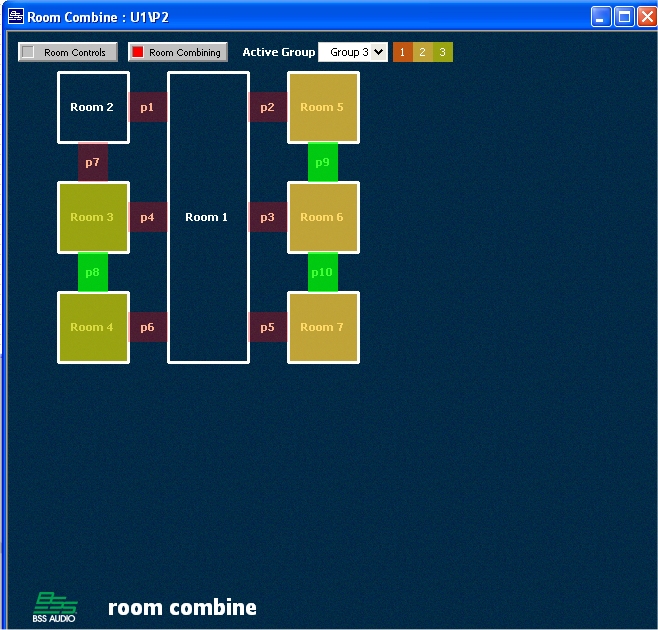
The wall partition between rooms 1 and 2 is closed
Rooms 1 and 2 are set to no specific group (None / 0)
Rooms 1 and 2 become black to show the rooms are not part of any group
- All controls for rooms 1 and 2 are unlinked
Opening a wall partition between groups
The wall partition between two existing groups is opened.
The rooms which are in the higher numbered group are set to be in the lower numbered group.
The rooms colours change appropriately showing the rooms in the new group.
- The controls for all rooms in the new group are linked.
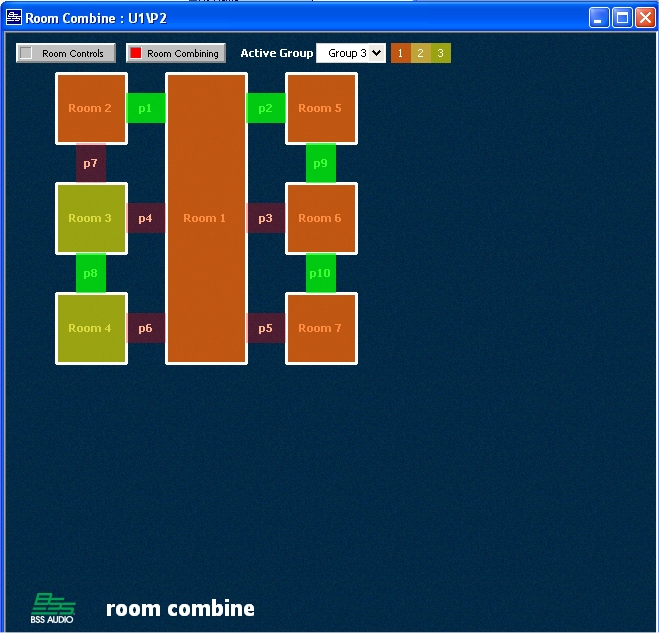
Closing a wall partition between groups
Closing a wall partition splits a group, creating two new groups
The room colours change appropriately showing the rooms are in two different groups
- Controls are unlinked between the rooms and linked according to their new groups
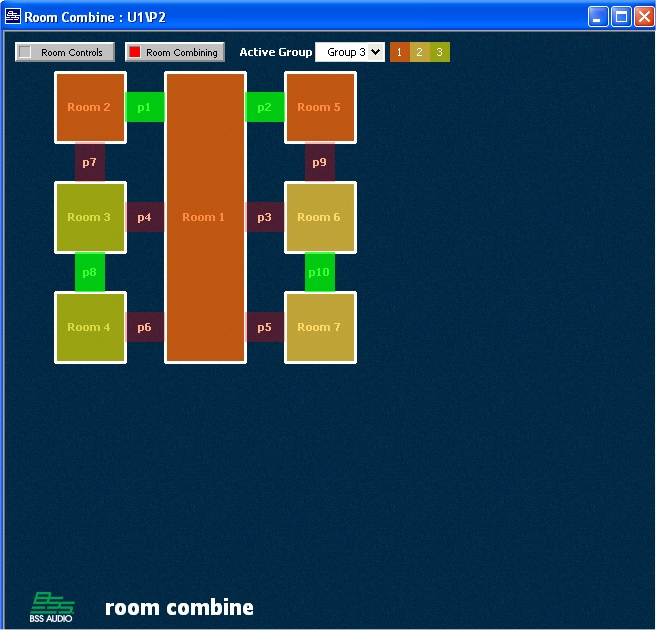
Room and Partition Mode
It is possible to use room and partition mode simultaneously.
Room Combine DSP Primitives
This section illustrates the use of DSP primitives by the Room Combine P.O. as an aid to understand how the P.O. works internally. The example below shows the processing which is required 'per room' for the following setup :
4 rooms
4 BGM inputs
'Mix BGM Signal Path' property = 'Yes'
'Enable Stereo' property = 'No'
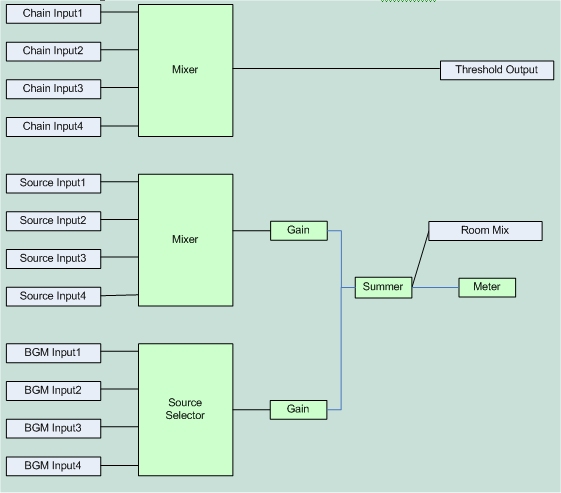
If separate BGM and room source outputs were required, i.e.
'Mix BGM Signal Path' property = 'No'
then the DSP primitives would look like :
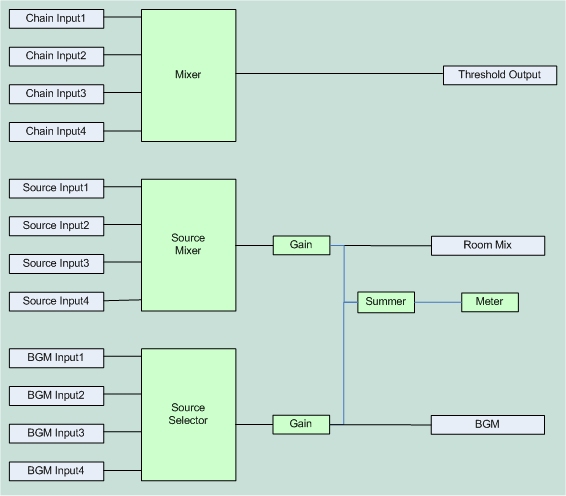
Notes :The two gains work like a 2 input 'n-input' gain. The actual gain applied is the gain for the source or BGM, PLUS the master gain.
The summer is a simple mixer that applies unity gain